With ActiveCampaign, you can use Split Test campaigns to see which version of your email resonates the most with your audience. Doing so helps you see what contacts are more likely to engage with so you can improve your email marketing strategy over time.
In this article, you’ll learn how Split Test campaigns work and how to create two types of split test campaigns.
Watch a video
How Split Test campaigns work
Split testing (also known as A/B testing) lets you compare different versions of your campaign to see which one gains the most opens or clicks. With split testing, there is the original (control) version and variations.
With ActiveCampaign, you can perform two types of split test campaigns: one that will test email subject lines and/or from information and the other that will test email subject lines, from information, and email content. You can also determine a winning email to send to the remainder of your list or do an equal split (no winner)
Split test email subject lines and/or "From" information
With this option, you can see which campaign contacts are most likely to engage with based on your subject line and/or from information. The "From" information is your sender name and email address.
Note that with this option, you must provide your subject line and "From" information before you can create duplicates to modify for split testing. The campaign design will remain the same for all versions.
Create the campaign and its variations
- Click Email on the left menu.
- Click "Start from scratch instead."
- Type the name of your campaign into the field provided. Only account users can see this campaign name.
- Click the “Split testing” option, then click “Email subjects and/or from information.”
- Click the “Next” button.
- Complete the fields for your subject line, preheader text (optional), "From" name, and "From" email address.
-
Click the + button to add a new variation of your campaign.
- For the new variation, the subject line, preheader text (optional), "From" name, and "From" email address will use the original version. Here, you can use a different subject line and/or "From" information. The campaign design will remain the same for all variations.
- Follow steps 6 and 7 above to add up to five variations.
Next, select your campaign builder and design your email.
Once you create your campaign design, we recommend testing it before you send it to your contacts
Split test email subject lines, "From" information, and email content
With this option, you can see which campaign contacts will most likely engage with you based on your subject line, "From" information, and email content. "From" information is your sender name and email address.
Note that with this option, you must provide your subject line, preheader text, "From" information, and design your campaign before you can create duplicates to modify for split testing. This helps you save time and make slight modifications before sending instead of recreating from scratch.
Create the campaign and its variations
- Click Email on the left menu.
- Click "Start from scratch instead."
- Type the name of your campaign into the field provided. Only account users can see this campaign name.
- Click the “Split testing” option, then click “Email subjects, from information, and email content.”
- Click the “Next” button.
- Complete the fields for your subject line, preheader text (optional), "From" name, and "From" email address.
- Select a campaign builder and design your campaign. When finished, click “Next” to navigate to the Campaign Summary page.
-
Click the “+” to duplicate your subject line, preheader text, "From" information, and design.
- Follow steps 6 and 7 above to add up to five variations.
- Modify your variations as needed.
- Make sure to test your campaign before sending it out to your contacts.
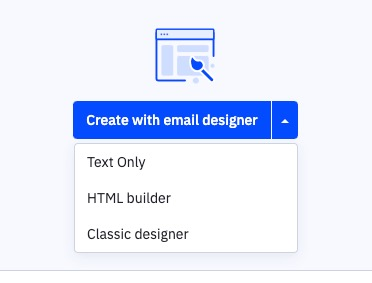
Select a Campaign Builder
Once you create, select the campaign builder you want to use. By default, “Create with email designer” is selected for you. To use any other options listed below, click the down caret:
-
Create with email designer
This option uses our improved drag-and-drop email designer, which includes an AI Text block. -
Text only
This is a plain text email. It is not possible to track opens or replies for this email type. Learn how to create and send plain-text emails. -
HTML builder
Use this option to create an email campaign using custom HTML. Learn how to create and send custom HTML campaigns. -
Classic designer
Use this option to create a campaign using the Classic drag-and-drop email designer. Learn more about content blocks available with the Classic Designer.
Once you select your builder, click the “Create with …” button.
Select a template
If you select the Email Designer or Classic Designer, you can choose a template for your campaign. You can choose from many templates based on layouts or business goals. You can also use a past campaign as a template or create your template from scratch.
Note that templates created for the Classic Designer cannot be used with the Email Designer and vice versa, as these are two different builders.
To learn more about the types of templates ActiveCampaign offers, see this "Email templates overview" help article.
If you selected the Text only or HTML builders, you can choose a template based on past Text only and HTML campaigns, respectively.
To choose a template, hover your mouse over the template you wish to use, then click the "Select" button.
Customize your campaign design
If you selected a template for the Email Designer or Classic Designer, you can customize your campaign layout to fit your needs and add content.
If you’re using the Email Designer, check out these resources:
- Email Designer overview
- Email Designer: Blocks explained
- Using Conditional Content
- Use personalization tags in your campaigns
- Link actions
If you’re using the Classic Designer, check out these resources:
- Classic Designer: Blocks explained
- Classic Designer: Link actions
- Using Conditional Content
- Use personalization tags in your campaigns
- Link actions
If you’re using the Text Only option, check out this resource:
If you’re using the HTML option, check out these resources:
- How to send a custom HTML campaign
- HTML email design guide
- Use personalization tags in your campaigns
Once you’ve finished customizing your design, click “Save and exit” to go to the Email Campaigns Overview page in your account, or click “Next” to complete your campaign details.
Test your split test campaign
You can test each variant of your campaign. The “Test and Preview” button for your campaign is located at the top of the Campaign Summary page. This button appears once you’ve created your design(s).
Clicking this button lets you send a test version of the campaign to up to 5 email addresses, provides a Desktop preview of your design, and provides a spam check score.
To perform an Email Client Preview:
- From the Campaign Summary page, click the variant you want to test.
- Click your email design.
-
Click the "Test Email" icon.
- A modal window will appear. Click the "View compatibility" button.
The Compatibility Preview modal will open and display how your email will look in various email clients. Note that this can take several minutes to load.
To test the different variants, click the variant from the Campaign Summary page, then click the “Test and Preview” button.
Note that if your subject lines are the same, the emails will show up in the order they were created, or you can temporarily change them while testing.
Configure your split test settings
Before sending your campaign, you must configure your split test settings on the Campaign Summary page.
There are two options you can choose from, "Do not determine the winner" and "Determine (and send using) the winner."
"Do not determine a winner"
This option sends your campaign variations to equal portions of your list. You can then view split testing reports to see which version performed the best after the campaign. It is not possible to modify these percentages.
"Determine (and send using) the winner"
This option sends your campaign variations to different portions of your list. After a set timeframe, the best variation will be sent to the remaining contacts on your list.
There are three steps you need to take to set this up:
-
Choose how the winning message should be determined.
You can choose from the best click rate or the best open rate. -
Determine when the winning message should be sent.
The default time period is set to two days. Most email engagement happens during this time frame. -
Set the email ratios.
You can determine what percentage of your list should receive each email variation. In most cases, you'll want these numbers to be equal. The last percentage, "Winning email," shows you the percentage of remaining contacts who will receive the email variation that performed the best.
Send your split test campaign
You're ready to send your email after you test your variations and configure your split test settings. To do so, click the "Send Now" button or schedule the campaign to send at a future date and time.